Worlds: Difference between revisions
From IdleOn MMO Wiki
imported>Wekhter mNo edit summary |
imported>Wekhter mNo edit summary |
||
| Line 41: | Line 41: | ||
{{Worldtable/row|[[File:Mr Pigibank.gif|30px]]|[[Mr Pigibank]]|NPC / [[Stamps]] Interface}} | {{Worldtable/row|[[File:Mr Pigibank.gif|30px]]|[[Mr Pigibank]]|NPC / [[Stamps]] Interface}} | ||
{{Worldtable/row|[[File:Grasslands Gary.gif|30px]]|[[Grasslands Gary]]|NPC / [[Tasks/Blunder Hills|Blunder Hills Taskboard]]}} | {{Worldtable/row|[[File:Grasslands Gary.gif|30px]]|[[Grasslands Gary]]|NPC / [[Tasks/Blunder Hills|Blunder Hills Taskboard]]}} | ||
{{Worldtable/row|[[File:Storage Chest.gif|30px]]|Storage Chest|Account-wide | {{Worldtable/row|[[File:Storage Chest.gif|30px]]|Storage Chest|Account-wide Item Storage}} | ||
{{Worldtable/row|[[File:Blunder Hills Vend.gif|50px]]|[[Vendors#Grassy Town|Blunder Hills Vendor]]|Vendor}} | {{Worldtable/row|[[File:Blunder Hills Vend.gif|50px]]|[[Vendors#Grassy Town|Blunder Hills Vendor]]|Vendor}} | ||
{{Worldtable/row|[[File:Builder Bird.gif|30px]]|[[Builder Bird]]|NPC}} | {{Worldtable/row|[[File:Builder Bird.gif|30px]]|[[Builder Bird]]|NPC}} | ||
| Line 56: | Line 56: | ||
=== G3 - Froggy Fields === | === G3 - Froggy Fields === | ||
{{Worldtable/head|Froggy Fields}} | {{Worldtable/head|Froggy Fields}} | ||
{{Worldtable/row|[[File:Dewdrop Colosseum Sprite.png|30px]]|[[Colosseum|Dewdrop Colosseum]]}} | {{Worldtable/row|[[File:Dewdrop Colosseum Sprite.png|30px]]|[[Colosseum/Dewdrop|Dewdrop Colosseum]]}} | ||
{{Worldtable/row|[[File:Frog Walking.gif|30px]]|[[Frog]]|Enemy}} | {{Worldtable/row|[[File:Frog Walking.gif|30px]]|[[Frog]]|Enemy}} | ||
{{Worldtable/row|[[File:Picnic Stowaway.gif|30px]]|[[Picnic Stowaway]]|NPC}} | {{Worldtable/row|[[File:Picnic Stowaway.gif|30px]]|[[Picnic Stowaway]]|NPC}} | ||
| Line 66: | Line 66: | ||
{{Worldtable/head|Valley of the Beans}} | {{Worldtable/head|Valley of the Beans}} | ||
{{Worldtable/row|[[File:Bored Bean Walking.gif|30px]]|[[Bored Bean]]|Enemy}} | {{Worldtable/row|[[File:Bored Bean Walking.gif|30px]]|[[Bored Bean]]|Enemy}} | ||
{{Worldtable/row|[[File:Promotheus.gif|30px]]|[[Promotheus]]|NPC ( | {{Worldtable/row|[[File:Promotheus.gif|30px]]|[[Promotheus]]|NPC (Class Choice)}} | ||
{{Worldtable/row|[[File:Birch Tree.png|30px]]|[[Choppin|Birch Tree (Choppin)]]|Source for {{CraftReq|Bleach Logs}}}} | {{Worldtable/row|[[File:Birch Tree.png|30px]]|[[Choppin|Birch Tree (Choppin)]]|Source for {{CraftReq|Bleach Logs}}}} | ||
|} | |} | ||
| Line 238: | Line 238: | ||
{{Worldtable/row|[[File:Alchemy Cauldron.gif|30px]]|[[Alchemy|Alchemy Cauldron]]|}} | {{Worldtable/row|[[File:Alchemy Cauldron.gif|30px]]|[[Alchemy|Alchemy Cauldron]]|}} | ||
{{Worldtable/row|[[File:Yum Yum Grotto Vendor.gif|30px]]|[[Vendors#Yum_Yum_Grotto|YumYum Grotto Shop]]|Vendor}} | {{Worldtable/row|[[File:Yum Yum Grotto Vendor.gif|30px]]|[[Vendors#Yum_Yum_Grotto|YumYum Grotto Shop]]|Vendor}} | ||
{{Worldtable/row|[[File:Obol Altar.gif|30px]]|[[ | {{Worldtable/row|[[File:Obol Altar.gif|30px]]|[[Obol Altar]]|NPC / [[Obols]] Interface}} | ||
{{Worldtable/row|[[File:Postboy Pablob.gif|30px]]|[[ | {{Worldtable/row|[[File:Postboy Pablob.gif|30px]]|[[Postboy Pablob]]|NPC / [[Post Office]]}} | ||
{{Worldtable/row|[[File:Cowbo Jones.gif|30px]]|[[Cowbo Jones]]|NPC}} | {{Worldtable/row|[[File:Cowbo Jones.gif|30px]]|[[Cowbo Jones]]|NPC}} | ||
{{Worldtable/row|[[File:Storage Chest.gif|30px]]|Storage Chest|}} | {{Worldtable/row|[[File:Storage Chest.gif|30px]]|Storage Chest|Account-wide Item Storage}} | ||
{{Worldtable/row|[[File:Desert Davey.gif|30px]]|[[ | {{Worldtable/row|[[File:Desert Davey.gif|30px]]|[[Desert Davey]]|NPC / [[Tasks/Yum Yum Desert|Yum-Yum Desert Taskboard]]}} | ||
|} | |} | ||
| Line 268: | Line 268: | ||
{{Worldtable/head|Jar Bridge}} | {{Worldtable/head|Jar Bridge}} | ||
{{Worldtable/row|[[File:Sandy Pot Walking.gif|30px]]|[[Sandy Pot]]|Enemy}} | {{Worldtable/row|[[File:Sandy Pot Walking.gif|30px]]|[[Sandy Pot]]|Enemy}} | ||
{{Worldtable/row|[[File:Fly Nest.png|30px]]|[[Catching| | {{Worldtable/row|[[File:Fly Nest.png|30px]]|[[Catching|Fly Nest (Catching)]]|Source for {{CraftReq|Fly}}}} | ||
|} | |} | ||
| Line 274: | Line 274: | ||
{{Worldtable/head|The Mimic Hole}} | {{Worldtable/head|The Mimic Hole}} | ||
{{Worldtable/row|[[File:Mimic Walking.gif|30px]]|[[Mimic]]|Enemy}} | {{Worldtable/row|[[File:Mimic Walking.gif|30px]]|[[Mimic]]|Enemy}} | ||
{{Worldtable/row|[[File:Sandstone Colosseum Sprite.png|30px]]|[[Colosseum | {{Worldtable/row|[[File:Sandstone Colosseum Sprite.png|30px]]|[[Colosseum/Sandstone|Sandstone Colosseum]]|Requires 2x {{CraftReq|Colosseum Ticket}} to enter}} | ||
{{Worldtable/row|[[File:Centurion.gif|30px]]|[[Centurion]]|NPC}} | {{Worldtable/row|[[File:Centurion.gif|30px]]|[[Centurion]]|NPC}} | ||
{{Worldtable/row|[[File:Snake Jar.gif|30px]]|[[Snake Jar]]|NPC}} | {{Worldtable/row|[[File:Snake Jar.gif|30px]]|[[Snake Jar]]|NPC}} | ||
| Line 282: | Line 282: | ||
{{Worldtable/head|Sandstone Colosseum}} | {{Worldtable/head|Sandstone Colosseum}} | ||
{{Worldtable/row||Multiple Enemies|See [[Colosseum#Sandstone_Colosseum|Sandstone Colosseum]]}} | {{Worldtable/row||Multiple Enemies|See [[Colosseum#Sandstone_Colosseum|Sandstone Colosseum]]}} | ||
{{Worldtable/row|[[File:Fishing Spot.gif|30px]]|[[Fishing|Fishing Spot]]|2 [[Fishing]] spots, spawns at Round 4 and Round 11 briefly | {{Worldtable/row|[[File:Fishing Spot.gif|30px]]|[[Fishing|Fishing Spot]]|2 [[Fishing]] spots, spawns at Round 4 and Round 11 briefly. [[Colosseum#Sandstone_Colosseum|Sandstone Colosseum]] Points Multiplier.}} | ||
{{Worldtable/row|[[File:Palmtree.png|30px]]|[[Choppin|Choppin (Palmtree)]]|Source for | {{Worldtable/row|[[File:Palmtree.png|30px]]|[[Choppin|Choppin (Palmtree)]]|Source for {{CraftReq|Tropilogs}}, spawns at Round 6 briefly. [[Colosseum#Sandstone_Colosseum|Sandstone Colosseum]] Points Multiplier.}} | ||
{{Worldtable/row|[[File:Platinum Node.png|30px]]|[[Mining|Platinum Ore Node (Mining)]]|Source for {{CraftReq|Platinum Ore}}, spawns at Round 8 briefly. [[Colosseum#Sandstone_Colosseum|Sandstone Colosseum]] Points Multiplier.}} | |||
{{Worldtable/row|[[File:Platinum Node.png|30px]]|[[Mining| | {{Worldtable/row|[[File:Void Node.png|30px]]|[[Mining|Void Ore Node (Mining)]]|Source for {{CraftReq|Void Ore}}, spawns at Round 14 briefly. [[Colosseum#Sandstone_Colosseum|Sandstone Colosseum]] Points Multiplier.}} | ||
{{Worldtable/row|[[File:Void Node.png|30px]]|[[Mining| | |||
|} | |} | ||
| Line 292: | Line 291: | ||
{{Worldtable/head|Bandit Bob's Hideout}} | {{Worldtable/head|Bandit Bob's Hideout}} | ||
{{Worldtable/row|[[File:Bandit Bob.gif|30px]]|[[Bandit Bob]]|NPC}} | {{Worldtable/row|[[File:Bandit Bob.gif|30px]]|[[Bandit Bob]]|NPC}} | ||
{{Worldtable/row|[[File:Butterfly Bar.png|30px]]|[[Catching| | {{Worldtable/row|[[File:Butterfly Bar.png|30px]]|[[Catching|Butterfly Bar (Catching)]]|Source for {{CraftReq|Butterfly}}}} | ||
|} | |} | ||
| Line 298: | Line 297: | ||
{{Worldtable/head|Dessert Dunes}} | {{Worldtable/head|Dessert Dunes}} | ||
{{Worldtable/row|[[File:Crabcake Walking.gif|30px]]|[[Crabcake]]|Enemy}} | {{Worldtable/row|[[File:Crabcake Walking.gif|30px]]|[[Crabcake]]|Enemy}} | ||
{{Worldtable/row|[[File:Speccius.gif|30px]]|[[Speccius]]|NPC | {{Worldtable/row|[[File:Speccius.gif|30px]]|[[Speccius]]|NPC (Subclass Choice)}} | ||
{{Worldtable/row|[[File:Palmtree.png|30px]]|[[Choppin|Choppin | {{Worldtable/row|[[File:Palmtree.png|30px]]|[[Choppin|Palm Tree (Choppin)]]|Source for {{CraftReq|Tropilogs}}}} | ||
|} | |} | ||
| Line 317: | Line 316: | ||
{{Worldtable/head|Pincer Plateau}} | {{Worldtable/head|Pincer Plateau}} | ||
{{Worldtable/row|[[File:Pincermin Walking.gif|30px]]|[[Pincermin]]|Enemy}} | {{Worldtable/row|[[File:Pincermin Walking.gif|30px]]|[[Pincermin]]|Enemy}} | ||
{{Worldtable/row|[[File:Sentient Bowl.png|30px]]|[[Catching| | {{Worldtable/row|[[File:Sentient Bowl.png|30px]]|[[Catching|Sentient Bowl (Catching)]]|Source for {{CraftReq|Sentient Cereal}}}} | ||
|} | |} | ||
| Line 336: | Line 335: | ||
{{Worldtable/row|[[File:Moonmoon Walking.gif|30px]]|[[Moonmoon]]|Enemy}} | {{Worldtable/row|[[File:Moonmoon Walking.gif|30px]]|[[Moonmoon]]|Enemy}} | ||
{{Worldtable/row|[[File:Loominadi.gif|30px]]|[[Loominadi]]|NPC}} | {{Worldtable/row|[[File:Loominadi.gif|30px]]|[[Loominadi]]|NPC}} | ||
{{Worldtable/row|[[File:Grocery Bag.png|30px]]|[[Catching| | {{Worldtable/row|[[File:Grocery Bag.png|30px]]|[[Catching|Grocery Bag (Catching)]]|Source for {{CraftReq|Fruitfly}}}} | ||
{{Worldtable/row|[[File:Wakawaka War Totem.gif|30px]]|[[Worship|Wakawaka War]]|Tower Defence}} | {{Worldtable/row|[[File:Wakawaka War Totem.gif|30px]]|[[Worship|Wakawaka War]]|[[Worship]] Totem (Tower Defence)}} | ||
|} | |} | ||
| Line 350: | Line 349: | ||
{{Worldtable/row|[[File:Snelbie Walking.gif|30px]]|[[Snelbie]]|Enemy}} | {{Worldtable/row|[[File:Snelbie Walking.gif|30px]]|[[Snelbie]]|Enemy}} | ||
{{Worldtable/row|[[File:Djonnut.gif|30px]]|[[Djonnut]]|NPC}} | {{Worldtable/row|[[File:Djonnut.gif|30px]]|[[Djonnut]]|NPC}} | ||
{{Worldtable/row|[[File:Cactolyte.gif|30px]]|[[Cactolyte]]|NPC}} | {{Worldtable/row|[[File:Cactolyte.gif|30px]]|[[Cactolyte]]|[[Secret]] NPC}} | ||
|} | |} | ||
=== D13 - Efaunts Tomb === | === D13 - Efaunts Tomb === | ||
{{Worldtable/head|Efaunts Tomb}} | {{Worldtable/head|Efaunts Tomb}} | ||
{{Worldtable/row|[[File:Efaunt (boss).png|200px]]|[[Efaunt]]|Boss. | {{Worldtable/row|[[File:Efaunt (boss).png|200px]]|[[Efaunt]]|World Boss. Requires 1 {{CraftReq|Efaunt's Tomb Key}} to enter.}} | ||
{{Worldtable/row|[[File:Dung Beat.png]]|[[Trapping|Dung Beat (Trapping)]]|Source for {{CraftReq|Dung Beat}} and {{CraftReq|Jade Scarab}}}} | {{Worldtable/row|[[File:Dung Beat.png]]|[[Trapping|Dung Beat (Trapping)]]|Source for {{CraftReq|Dung Beat}} and {{CraftReq|Jade Scarab}}}} | ||
|} | |} | ||
| Line 395: | Line 394: | ||
{{Worldtable/row|[[File:Frostbite Towndra Vendor.gif|30px]]|Frostbite Towndra Shop|[[Vendors#Frostbite Towndra Shop|Vendor]]}} | {{Worldtable/row|[[File:Frostbite Towndra Vendor.gif|30px]]|Frostbite Towndra Shop|[[Vendors#Frostbite Towndra Shop|Vendor]]}} | ||
{{Worldtable/row|[[File:Prayer Stone.gif|30px]]|Prayer Stone|[[Worship#Prayers|Worship]]}} | {{Worldtable/row|[[File:Prayer Stone.gif|30px]]|Prayer Stone|[[Worship#Prayers|Worship]]}} | ||
{{Worldtable/row|[[File:Iceland_Irwin.gif|30px]]|[[Iceland Irwin]]| | {{Worldtable/row|[[File:Iceland_Irwin.gif|30px]]|[[Iceland Irwin]]|NPC / [[Tasks/Frostbite Tundra|Frostbite Tundra Taskboard]]}} | ||
{{Worldtable/row|[[File:Hoggindaz.gif|30px]]|[[Hoggindaz]]|NPC}} | {{Worldtable/row|[[File:Hoggindaz.gif|30px]]|[[Hoggindaz]]|NPC}} | ||
{{Worldtable/row|[[File:Carpenter Cardinal.gif|30px]]|[[Carpenter Cardinal]]|NPC}} | {{Worldtable/row|[[File:Carpenter Cardinal.gif|30px]]|[[Carpenter Cardinal]]|NPC}} | ||
| Line 403: | Line 402: | ||
{{Worldtable/head|Steep Sheep Ledge}} | {{Worldtable/head|Steep Sheep Ledge}} | ||
{{Worldtable/row|[[File:Sheepie_Walking.gif|30px]]|[[Sheepie]]|Enemy}} | {{Worldtable/row|[[File:Sheepie_Walking.gif|30px]]|[[Sheepie]]|Enemy}} | ||
{{Worldtable/row|[[File:Saharan Foal.png|30px]]|[[Choppin| | {{Worldtable/row|[[File:Saharan Foal.png|30px]]|[[Choppin|Saharan Foal (Choppin)]]|Source for {{CraftReq|Tundra Logs}}}} | ||
|} | |} | ||
| Line 412: | Line 411: | ||
{{Worldtable/row|[[File:Frost Flake Walking.gif|30px]]|[[Frost Flake]]|Enemy}} | {{Worldtable/row|[[File:Frost Flake Walking.gif|30px]]|[[Frost Flake]]|Enemy}} | ||
{{Worldtable/row|[[File:Lonely Hunter.gif|30px]]|[[Lonely Hunter]]|NPC}} | {{Worldtable/row|[[File:Lonely Hunter.gif|30px]]|[[Lonely Hunter]]|NPC}} | ||
{{Worldtable/row|[[File:Chillsnap Colosseum Sprite.png|30px]]|[[Colosseum|Chillsnap Colosseum]]|Colosseum}} | {{Worldtable/row|[[File:Chillsnap Colosseum Sprite.png|30px]]|[[Colosseum/Chillsnap|Chillsnap Colosseum]]|Requires 3x {{CraftReq|Colosseum Ticket}} to enter}} | ||
|} | |} | ||
| Line 418: | Line 417: | ||
{{Worldtable/head|The Stache Split}} | {{Worldtable/head|The Stache Split}} | ||
{{Worldtable/row|[[File:Sir Stache Walking.gif|30px]]|[[Sir Stache]]|Enemy}} | {{Worldtable/row|[[File:Sir Stache Walking.gif|30px]]|[[Sir Stache]]|Enemy}} | ||
{{Worldtable/row|[[File:Pingy.png]]|[[Trapping|Pingy (Trapping]]|Source for {{CraftReq|Pingy}} and {{CraftReq|Eternal Lord of The Undying Ember}}}} | {{Worldtable/row|[[File:Pingy.png]]|[[Trapping|Pingy (Trapping)]]|Source for {{CraftReq|Pingy}} and {{CraftReq|Eternal Lord of The Undying Ember}}}} | ||
{{Worldtable/row|[[File:Snouts.gif|30px]]|[[Snouts]]|NPC}} | {{Worldtable/row|[[File:Snouts.gif|30px]]|[[Snouts]]|NPC}} | ||
|} | |} | ||
| Line 431: | Line 430: | ||
{{Worldtable/row|[[File:Mamooth Walking.gif|30px]]|[[Mamooth]]|Enemy}} | {{Worldtable/row|[[File:Mamooth Walking.gif|30px]]|[[Mamooth]]|Enemy}} | ||
{{Worldtable/row|[[File:Shuvelle.gif|30px]]|[[Shuvelle]]|NPC}} | {{Worldtable/row|[[File:Shuvelle.gif|30px]]|[[Shuvelle]]|NPC}} | ||
{{Worldtable/row|[[File:Snowden.png|30px]]|[[Catching|Catching | {{Worldtable/row|[[File:Snowden.png|30px]]|[[Catching|Snowden (Catching)]]|Source for {{CraftReq|Mosquisnow}}}} | ||
|} | |} | ||
| Line 454: | Line 453: | ||
{{Worldtable/head|Waterlogged Entrance}} | {{Worldtable/head|Waterlogged Entrance}} | ||
{{Worldtable/row|[[File:Quenchie Walking.gif|30px]]|[[Quenchie]]|Enemy}} | {{Worldtable/row|[[File:Quenchie Walking.gif|30px]]|[[Quenchie]]|Enemy}} | ||
{{Worldtable/row|[[File:Wispy Tree.png|30px]]|[[Choppin| | {{Worldtable/row|[[File:Wispy Tree.png|30px]]|[[Choppin|Wispy Tree (Choppin)]]|Source for {{CraftReq|Wispy Lumber}}}} | ||
|} | |} | ||
| Line 467: | Line 466: | ||
{{Worldtable/row|[[File:Bop Box Walking.gif|30px]]|[[Bop Box]]|Enemy}} | {{Worldtable/row|[[File:Bop Box Walking.gif|30px]]|[[Bop Box]]|Enemy}} | ||
{{Worldtable/row|[[File:Bill Brr.gif|30px]]|[[Bill Brr]]|NPC}} | {{Worldtable/row|[[File:Bill Brr.gif|30px]]|[[Bill Brr]]|NPC}} | ||
{{Worldtable/row|[[File:Icicle Nest.png|30px]]|[[Catching| | {{Worldtable/row|[[File:Icicle Nest.png|30px]]|[[Catching|Icicle Nest (Catching)]]|Source for {{CraftReq|Flycicle}}}} | ||
|} | |} | ||
| Line 484: | Line 483: | ||
{{Worldtable/head|Wam Wonderland}} | {{Worldtable/head|Wam Wonderland}} | ||
{{Worldtable/row|[[File:Dedotated Ram Walking.gif|30px]]|[[Dedotated Ram]]|Enemy}} | {{Worldtable/row|[[File:Dedotated Ram Walking.gif|30px]]|[[Dedotated Ram]]|Enemy}} | ||
{{Worldtable/row|[[File:Honker.png]]|[[Trapping|Honker (Trapping]]|Source for {{CraftReq|Honker}} and {{CraftReq|Diamond Duck}}}} | {{Worldtable/row|[[File:Honker.png]]|[[Trapping|Honker (Trapping)]]|Source for {{CraftReq|Honker}} and {{CraftReq|Diamond Duck}}}} | ||
|} | |} | ||
Revision as of 22:27, 13 August 2021
There are currently three in-game worlds: Blunder Hills (the introductory world), Yum-Yum Desert (unlocked after defeating Amarok), and Frostbite Tundra (unlocked after defeating Efaunt).

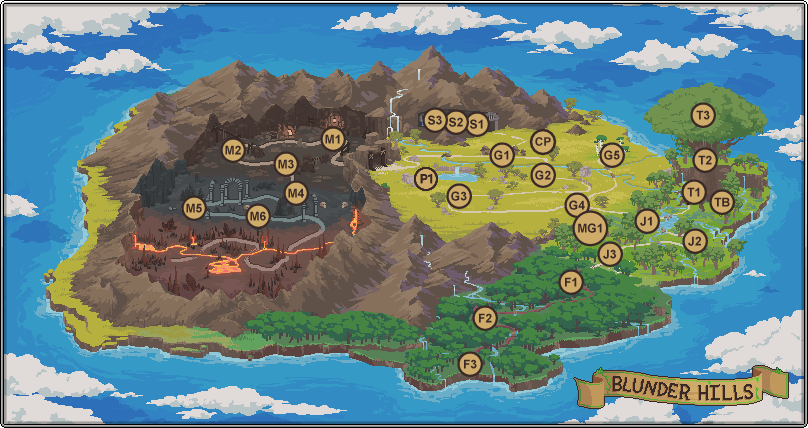

World 1
G1 - Blunder Hills
| Img | Name | Info |
|---|---|---|
| Forge | Convert Ore to Bars | |
| Anvil | Smithing Interface | |
| Scripticus | NPC | |
| Town Marble | NPC / Statues Interface | |
| Mr Pigibank | NPC / Stamps Interface | |
| Grasslands Gary | NPC / Blunder Hills Taskboard | |
| Storage Chest | Account-wide Item Storage | |
| Blunder Hills Vendor | Vendor | |
| Builder Bird | NPC | |
| Desert Portal | Portal to Yum-Yum Desert |
G2 - Spore Meadows
| Img | Name | Info |
|---|---|---|
| Green Mushroom | Enemy | |
| Woodsman | NPC | |
| Oak Tree (Choppin) | Source for |
G3 - Froggy Fields
| Img | Name | Info |
|---|---|---|
| Dewdrop Colosseum | ||
| Frog | Enemy | |
| Picnic Stowaway | NPC | |
| Hamish | NPC | |
| Rocklyte | Secret NPC |
G4 - Valley Of The Beans
| Img | Name | Info |
|---|---|---|
| Bored Bean | Enemy | |
| Promotheus | NPC (Class Choice) | |
| Birch Tree (Choppin) | Source for |
G5- Birch Enclave
| Img | Name | Info |
|---|---|---|
| Baba Yaga | Optional Miniboss. Spawns at the top of every hour. | |
| Red Mushroom | Enemy |
J1 - Jungle Perimeter
| Img | Name | Info |
|---|---|---|
| Slime | Enemy | |
| Stiltzcho | NPC | |

|
Froge (Trapping) | Source for |
J2 - Winding Willows
| Img | Name | Info |
|---|---|---|
| Baby Boa | Enemy | |
| Funguy | NPC |
J3 - Vegetable Patch
| Img | Name | Info |
|---|---|---|
| Carrotman | Enemy | |
| Jungle Tree (Choppin) | Source for | |
| Bushlyte | Secret NPC |
J3 -> MG1 - Spike Surprise
| Img | Name | Info |
|---|---|---|
| Spike Surprise Minigame | You can also get here by typing "If u love me let me go" in the chat. Starts at the top of every hour. Play for gems and glory. |
F1 - Forest Outskirts
| Img | Name | Info |
|---|---|---|
| Glublin | Enemy | |
| Goblin Gorefest | Worship Totem (Tower Defence) |
F2 - Encroaching Forest Villas
| Img | Name | Info |
|---|---|---|
| Wode Board | Enemy | |
| Dog Bone | NPC | |
| Obol Altar | NPC / Obols Interface | |
| Tiki Chief | NPC | |
| Encroaching Forest Villas Vendor | Vendor |
F2 - Amarok Arena
| Img | Name | Info |
|---|---|---|
.png)
|
Amarok | World Boss. Requires 1 |
F3 - Tucked Away
| Img | Name | Info |
|---|---|---|
| Giga Frog | Enemy | |
| Papua Piggea | NPC | |
| Choppin (Forest Tree) | Source for |
TB - The Roots
| Img | Name | Info |
|---|---|---|
| Acorn Assault | Worship Totem (Tower Defence) |
T1 - The Base Of The Bark
| Img | Name | Info |
|---|---|---|
| Walking Stick | Enemy | |
| Sprout | NPC |
T2 - Hollowed Trunk
| Img | Name | Info |
|---|---|---|
| Nutto | Enemy | |
| Stump Tree (Choppin) | Source for | |
| Dazey | NPC | |

|
Owlio (Trapping) | Source for |
T3 - Where the Branches End
| Img | Name | Info |
|---|---|---|
| Wood Mushroom | Enemy | |
| Telescope | NPC / Star Signs Interface |
M1 - Tunnels Entrance
| Img | Name | Info |
|---|---|---|
| Copper Ore Node (Mining) | Source for | |
| Forge | Convert Ore into Bars | |
| Glumlee | NPC |
M2 - Freefall Caverns
| Img | Name | Info |
|---|---|---|
| Iron Ore Node (Mining) | Source for | |
| Gold Ore Node (Mining) | Source for | |
| Krunk | NPC | |
| Mutton | NPC |
M3 - The Ol Straightaway
| Img | Name | Info |
|---|---|---|
| Platinum Ore Node (Mining) | Source for | |
| Dementia Ore Node (Mining) | Source for |
M4 - Echoing Egress
| Img | Name | Info |
|---|---|---|
| Void Ore Node (Mining) | Source for | |
| Lustre Ore Node (Mining) | Source for |
M5 - Slip Slidy Ledges
| Img | Name | Info |
|---|---|---|
| Starfire Ore Node (Mining) | Source for |
M6 - High In The Sky
Inaccessible as of 1.05.
S1 - Poopy Sewers
| Img | Name | Info |
|---|---|---|
| Poop | Enemy | |
| Toilet Tree (Choppin) | Source for |
S2 - Rats Nest
| Img | Name | Info |
|---|---|---|
| Rat | Enemy | |
| TP Pete | NPC | |

|
Mousey (Trapping) | Source for |
S3 - The Office
| Img | Name | Info |
|---|---|---|

|
Dr Defecaus | Optional Miniboss. Spawns daily. |
| Poop | Enemy |


World 2
D0 - YumYum Grotto
| Img | Name | Info |
|---|---|---|
| Alchemy Cauldron | ||
| YumYum Grotto Shop | Vendor | |
| Obol Altar | NPC / Obols Interface | |
| Postboy Pablob | NPC / Post Office | |
| Cowbo Jones | NPC | |
| Storage Chest | Account-wide Item Storage | |
| Desert Davey | NPC / Yum-Yum Desert Taskboard |
F1 - Salty Shores
| Img | Name | Info |
|---|---|---|
| Fishing Spot | 2 Fishing spots | |
| Fishing Rack | Change Fishing Accessories | |
| Whattso | NPC | |

|
Crabbo (Trapping) | Source for |
F2- Faraway Piers
| Img | Name | Info |
|---|---|---|
| Fishing Spot | 3 Fishing spots | |
| Fishing Rack | Change Fishing Accessories | |
| Scubidew | NPC | |
| Fishpaste97 | NPC | |
| Faraway Piers Shop | Vendor |
F3 - Deepwater Docks
Inaccessible as of 1.05 (warps to G2 Spore Meadows).
D1 - Jar Bridge
| Img | Name | Info |
|---|---|---|
| Sandy Pot | Enemy | |
| Fly Nest (Catching) | Source for |
D2 - The Mimic Hole
| Img | Name | Info |
|---|---|---|
| Mimic | Enemy | |
| Sandstone Colosseum | Requires 2x | |
| Centurion | NPC | |
| Snake Jar | NPC |
Sandstone Colosseum
| Img | Name | Info |
|---|---|---|
| Multiple Enemies | See Sandstone Colosseum | |
| Fishing Spot | 2 Fishing spots, spawns at Round 4 and Round 11 briefly. Sandstone Colosseum Points Multiplier. | |
| File:Palmtree.png | Choppin (Palmtree) | Source for |
| Platinum Ore Node (Mining) | Source for | |
| Void Ore Node (Mining) | Source for |
D3 - Bandit Bob's Hideout
| Img | Name | Info |
|---|---|---|
| Bandit Bob | NPC | |
| Butterfly Bar (Catching) | Source for |
D4 - Dessert Dunes
| Img | Name | Info |
|---|---|---|
| Crabcake | Enemy | |
| Speccius | NPC (Subclass Choice) | |
| File:Palmtree.png | Palm Tree (Choppin) | Source for |
D5 - The Grandioso Canyon
| Img | Name | Info |
|---|---|---|
| Mafioso | Enemy | |
| XxX Cattleprod XxX | NPC |
D6 - Shifty Sandbox
| Img | Name | Info |
|---|---|---|
| Sand Castle | Enemy | |
| Goldric | NPC |
D7 - Pincer Plateau
| Img | Name | Info |
|---|---|---|
| Pincermin | Enemy | |
| Sentient Bowl (Catching) | Source for |
D8 - Slamabam Straightaway
| Img | Name | Info |
|---|---|---|
| Mashed Potato | Enemy | |
| Carpetiem | NPC |
D9 - The Ring
| Img | Name | Info |
|---|---|---|
| Tyson | Enemy | |

|
Scorpie (Trapping) | Source for |
D10 - Up Up Down Down
| Img | Name | Info |
|---|---|---|
| Moonmoon | Enemy | |
| Loominadi | NPC | |
| Grocery Bag (Catching) | Source for | |
| Wakawaka War | Worship Totem (Tower Defence) |
D11 - Sands of Time
| Img | Name | Info |
|---|---|---|
| Sand Giant | Enemy | |
| Wellington | NPC |
D12 - Djonnuttown
| Img | Name | Info |
|---|---|---|
| Snelbie | Enemy | |
| Djonnut | NPC | |
| Cactolyte | Secret NPC |
D13 - Efaunts Tomb
| Img | Name | Info |
|---|---|---|
.png)
|
Efaunt | World Boss. Requires 1 |

|
Dung Beat (Trapping) | Source for |

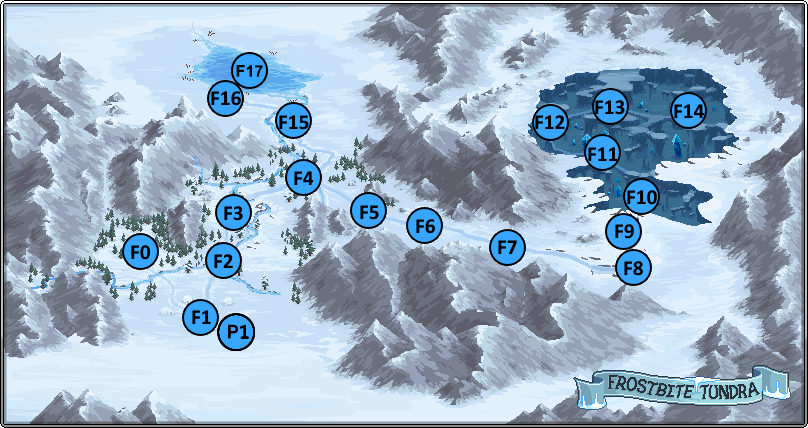

World 3
F0 - Trappers Folley
| Img | Name | Info |
|---|---|---|
| Lord of the Hunt | NPC |
F1 - Frostbite Towndra
| Img | Name | Info |
|---|---|---|
| Construction Table | Construction | |
| Refinery | Construction | |
| Frostbite Towndra Shop | Vendor | |
| Prayer Stone | Worship | |
| Iceland Irwin | NPC / Frostbite Tundra Taskboard | |
| Hoggindaz | NPC | |
| Carpenter Cardinal | NPC |
F2 - Steep Sheep Ledge
| Img | Name | Info |
|---|---|---|
| Sheepie | Enemy | |
| Saharan Foal (Choppin) | Source for |
F3 - Snowfield Outskirts
| Img | Name | Info |
|---|---|---|
| Frost Flake | Enemy | |
| Lonely Hunter | NPC | |
| Chillsnap Colosseum | Requires 3x |
F4 - The Stache Split
| Img | Name | Info |
|---|---|---|
| Sir Stache | Enemy | |

|
Pingy (Trapping) | Source for |
| Snouts | NPC |
F5 - Refrigeration Station
| Img | Name | Info |
|---|---|---|
| Bloque | Enemy |
F6 - Mamooooth Mountain
| Img | Name | Info |
|---|---|---|
| Mamooth | Enemy | |
| Shuvelle | NPC | |
| Snowden (Catching) | Source for |
F7 - Rollin' Tundra
| Img | Name | Info |
|---|---|---|
| Snowman | Enemy |
F8 - Signature Slopes
| Img | Name | Info |
|---|---|---|
| Penguin | Enemy | |
| Yondergreen | NPC |
F9 - Thermonuclear Climb
| Img | Name | Info |
|---|---|---|
| Thermister | Enemy | |

|
Bunny (Trapping) | Source for |
F10 - Waterlogged Entrance
| Img | Name | Info |
|---|---|---|
| Quenchie | Enemy | |
| Wispy Tree (Choppin) | Source for |
F11 - Cryo Catacombs
| Img | Name | Info |
|---|---|---|
| Cryosnake | Enemy | |
| Crystalswine | NPC |
F12 - Overpass of Sound
| Img | Name | Info |
|---|---|---|
| Bop Box | Enemy | |
| Bill Brr | NPC | |
| Icicle Nest (Catching) | Source for |
F13 - Crystal Basecamp
| Img | Name | Info |
|---|---|---|
| Neyeptune | Enemy | |
| Bellows | NPC |
F14 - Eycicles's Nest
| Img | Name | Info |
|---|---|---|
| ? |
F15 - Wam Wonderland
| Img | Name | Info |
|---|---|---|
| Dedotated Ram | Enemy | |

|
Honker (Trapping) | Source for |
F16 - Hell hath Frozen Over
| Img | Name | Info |
|---|---|---|
| Bloodbone | Enemy |